Wurker Documentation
Table of Contents
- Version
- Introduction
- System Dependencies
- Installation
- Test Run
- Configuration
- Usage
- Advanced
- Versions
- Change Log
- v0.1.30 - 2026-07-09
- v0.1.27 - 2026-07-08
- v0.1.26 - 2026-06-05
- v0.1.17 - 2026-02-07
- v0.1.16 - 2026-01-17
- v0.1.15 - 2026-01-17
- v0.1.14 - 2026-01-17
- v0.1.13 - 2025-05-15
- v0.1.12 - 2025-05-16
- v0.1.11 - 2025-05-14
- v0.1.10 - 2025-05-12
- v0.1.7 - 2025-04-15
- v0.1.6 - 2025-04-15
- v0.1.5 - 2025-04-15
- v0.1.4 - 2025-04-14
- v0.1.3 - 2025-04-13
- v0.1.2 - 2025-04-13
- v0.1.1 - 2025-04-13
- v0.1.0 - 2025-04-09
- v0.0.20 - 2024-04-26
- Authors
- Copyright
If cron and supervisor had a super-powered love child.
- Schedule and supervise jobs using internal Python modules, or external scripts and commands.
- Schedule on-demand jobs to run once. Or run jobs from the command-line.
- Configure and manage jobs from the command-line, via API, or using the web app UI.
Version
0.1.30
Introduction
Wurker runs jobs – called "Bees" (external) or "PyBees" (internal) – as forked subprocesses of the parent wurk command.
- Bees: Are executed using
subprocess.Popen() - PyBees: Are executed using
multiprocessing.Process()
The BaseBee class provides a common interface to both Bees and PyBees so that Wurker can otherwise treat them the same.
Terminology
- Colony: a cluster of Wurker nodes.
- Queen: the controller node of a Colony. May be the only node.
- Drone: a worker node of a Colony.
- Bee: a single job, either the job definition, or the running process, itself.
- Command: a single command (script or Python module) that Bees reference.
- Cron: a single
scheduledorsuperviseddefinition of how and when to run. - Hive: the set of currently-running Bees.
Features
- Sting: inject dependencies into Wurker, including
wurker.toml,bees,settings,models,seeds, and secretdata, such asdata/user.json. - Seed: declare Commands, Bees, Crons and Maps to be added, updated, or deleted.
- Schedule: run short-lived Bees as
scheduledoncron-type schedules. - Supervise: run long-lived Bees as
supervisedand restart the process if it dies. - Ondemand: run any enabled Bees one time immediately.
- CLI: easily add, remove, and edit Bees, Crons, and Maps from the command-line using JSON.
- UI: serve a dashboard to view and enable or disable Bees, including the Hive.
- API: perform many of the same actions as CLI or UI via API request. Used by the Queen to talk to Drones.
System Dependencies
Python 3
Wurker requires a minimum Python version of 3.10. A virtual environment is strongly recommended.
Databases
Wurker uses two databases:
- Remote Configuration DB: by default a
sqlite3file indata/wurker-remote.db(defined inetc/wurker.toml). - Local DBs:
sqlite3file indata/wurker.dbkeeps track of Wurker processes and Wurker UI users.
Both databases are configured through SQLAlchemy, so you can switch either one to any supported DBMS by editing [local_db] or [remote_db] in wurker.toml. SQLite works out of the box. For MySQL or PostgreSQL, install the optional extras:
pip install wurker[mysql]
pip install wurker[postgres]
To use the default MySQL DBAPI, first install the Python 3 and MySQL development headers and libraries:
Debian/Ubuntu
sudo apt-get install python3-dev default-libmysqlclient-dev build-essential libsqlite3-dev
Enterprise Linux
sudo yum install python3-devel mysql-devel sqlite-devel
Web UI Assets
Wurker UI uses vanilla JavaScript, but it includes a JSON editor widget. The editor assets are vendored under ui/static/vendor/jsoneditor so that wurker-ui run works without requiring Node.js. If you prefer to update the JSON editor from npm for development, you can install it locally and refresh the vendored files.
Web Server
If you are deploying to production and want to use the web app UI, you will need to install nginx.
Further instructions may be found in the Production section.
Ubuntu
sudo apt install curl gnupg2 ca-certificates lsb-release ubuntu-keyring nginx
Debian
sudo apt install curl gnupg2 ca-certificates lsb-release debian-archive-keyring nginx
Enterprise Linux
sudo yum install yum-utils nginx
Installation
From PyPi
Wurker may be installed from PyPi using Pip or similar package manager. A Python virtual environment is strongly recommended:
pip install wurker
If you plan to use MySQL or PostgreSQL, install the optional extras:
pip install wurker[mysql]
pip install wurker[postgres]
From Source
Alternatively, Wurker may be cloned and run as a Hatch project.
Next, install system dependencies, as documented in System Dependencies.
After hatch and all system dependencies are successfully installed, cd into the wurker directory and do:
hatch env create
hatch shell
Upgrade Requirements
Existing version 0.0.X Wurker installs will need to meet new system requirements.
Python >= 3.10
Install from source, with a utility like Hatch or pyenv, or with a third-party PPA.
SQLAlchemy >= 2.0
Versions of Wurker previous to 0.1.0 used SQLAlchemy 1.4, which enabled enterprise admins to clone the project and install it into a common virtual environment as a Git submodule to a parent project.
Wurker now requires installation into a virtual environment (preferred), or system-wide installation.
Stinger Refactor
If you have an existing Stinger repo from Wurker previous to 0.1.0, you can partially refactor them to the new PyPi-compatible package requirements using the command:
wurk admin stinger refactor --root /path/to/stingers/
See: Refactor
Testing
Before running the test suite, you need to initialize the test environment with the default stinger and seed data:
wurk admin init
Or, if you prefer the explicit steps:
wurk admin stinger sting
wurk admin seed
After initializing the test environment, you can run the full test suite with:
hatch run pytest src/wurker/tests/ -v
Or run individual test files:
hatch run pytest src/wurker/tests/test_00_core.py -v
PyBee Refactor
Additionally, Python import paths will need to be refactored to respect the wurker namespace in PyBees.
For example, in a PyBee, refactor something like:
import settings
from bees.test_pybee import run
To something like:
from wurker.settings import conf
from wurker.bees.test_pybee import run
Custom Stinger-injected plugin modules and settings will now fall under the wurker namespace:
from wurker.settings.bees import custom_conf
from wurker.models.custom import CustomModel
from wurker.lib.custom import CustomClass
Custom Python Requirements
You may use Stingers to inject additional Python requirements into etc/requirements.txt. You, or your CI/CD, will need to then perform additional package installation:
pip install -r etc/requirements.txt
Seek Help
You can check that installation worked by executing the following commands:
wurk --help
Test Run
These instructions are only intended to help ensure proper installation during startup versions. You still need to properly configure it, as described in the Configuration section.
Sting Defaults
Use the default Stinger to inject basic dependencies, including test Seeds and Bees:
wurk admin init
Or run the explicit stinger command:
wurk admin stinger sting
This will inject local resources. For custom dependency-injection, see the Stingers section.
The default database set in etc/wurker.toml will be a SQLite file named wurker.db. See the Configuration section for details.
Seed Stung
After injecting resources, you can seed the local and remote configuration databases:
wurk admin seed
Play Around
Finally, and optionally, you can enable some of the test Bees:
wurk edit bee test_scheduled_bee <<EOF
{"enabled": true}
EOF
You can see that test_scheduled_bee was enabled with the command:
wurk show
Run Around
And you can run the Hive in the foreground with the command, while logging to stderr:
wurk run
If you choose to log to syslog, instead, you can open a separate terminal and do:
journalctl -f
You can also override the wurker.toml log setting from the command-line. Type C-c to stop running, then run again but this time, force logging to dump to stderr:
wurk --log stderr run
Logging Notes
Running Wurker this way is only for development and devops use. In production, Wurker will run as a systemd service, and we will use wurk in parallel to access the same runtime and configuration data as the service.
For example, when running Wurker as a service, we can follow all the logs this way:
journalctl -u wurker -f
But when running wurk run we cannot follow -u wurker because that is the name of a systemd unit which does not exist. Instead, we must follow a text name, like -t Wurker.
If all else fails, follow and filter logs like:
journalctl -f | grep Wurker
Test Run Wurker UI
Since our Test Run example is a Queen (all singleton nodes are Queens) we can also serve the Dashboard GUI.
Open a new terminal, so you don't interrupt the running Wurker. Then in the new terminal, activate your virtual environment and run the command:
wurker-ui run
Then browse to specified URL.
The default UI username is wurkeradmin. On init, Wurker replaces the shipped default password with a generated one and prints it once — store it when you see it. To choose your own credentials instead, pass --username and --password to wurk admin init.
To create your own Wurker UI credentials, see the Stingers section.
Configuration
Wurker configuration is divided into three section: Wurker, UI, Local DB and Remote DB.
By default, Wurker uses two separate SQLite files: data/wurker.db for local state and UI users, and data/wurker-remote.db for remote configuration data. You can switch either database to any SQLAlchemy-supported DBMS by updating the [local_db] or [remote_db] sections in wurker.toml.
Local Config
To configure Wurker locally, it is enough to use the default wurker.toml file:
[wurker]
name = "Wurker"
app_id = "6b018c2b-77b7-40ca-bb82-cc8378252f67" # Must be UUID
env = "local"                                   # 'local', 'development', or 'production'
log = "stderr"                                  # 'stderr' or 'syslog'
loglevel = "debug"
is_queen = true
debug = true

[ui]
domain = ""                                     # Default: localhost
workers = 3                                     # Default: 3
secret_key = ""                                 # Flask session key; generated and persisted by 'wurk admin init'

[local_db]
hostname = ""                                   # Default: local sqlite file
username = ""                                   # Default: local sqlite file
password = ""                                   # Default: local sqlite file
database = "wurker.db"                          # Default: local sqlite file 'wurker.db'
dbdriver = "sqlite"                             # Default: 'sqlite'
port = 0

[remote_db]
hostname = ""                                   # Default: local sqlite file
username = ""                                   # Default: local sqlite file
password = ""                                   # Default: local sqlite file
database = "wurker-remote.db"                  # Default: local sqlite file 'wurker-remote.db'
dbdriver = "sqlite"                             # Default: 'sqlite'
port = 0
While the wurker.toml file alone is sufficient for a few Bees abuzz, Wurker operators may additionally configure custom Python and JSON dependencies using Stingers.
Remote Config
Wurker configuration of Commands, Crons, and Bees are defined in remote database tables within the schema specified by [remote_db] in the previous Local Config section.
- A Command is either a path to a command (ex:
/usr/bin/ls), or the name of a module inbees/. - A Supervised Cron is a
wurker_cronthat has a nullcronfield. - A Scheduled Cron is a
wurker_cronwith a validcronfield in crontab notation. - An Orphaned Bee is any Bee that is not mapped to a Cron, either supervised or scheduled.
- A Disabled Bee is any Bee that is not enabled. Bees may be both orphaned and disabled.
Because Wurker permits the use of internal PyBees, it also permits internal configuration of PyBees and PyBee-compatible modules.
PyBee Config
Internal Bees in the local bees module are really just a run() function. You may then add a settings/bees/<module_name>.py file to be loaded as settings.bees.<module_name> automatically when the PyBee is loaded. The PyBee may be as simple as:
def run():
    print("Hello, World!")
PyBees should declare the database model plugins they want to use in a models Stinger. They may then do simple imports for custom databases, like:
from wurker.models.custom import CustomModel
In addition, PyBees may inject settings plugins via Stinger which may then be easily imported:
from wurker.settings.bees.custom import SOMETHING
PyBee plugins must accept **kwargs which may be stored in the wurker_bee.args field in the configuration database, and will be passed to the PyBee at runtime. For example:
def run(name="World", **kwargs):
    print(f"Hello, {name}")
PyBees may also use custom libraries in libs/. For example, one might write and import an AWS S3 client:
from wurker.lib.custom import S3Client
Bee Config
External Bees must be configured independently. They may be commands in the local $PATH, programs executed with an absolute path in the local file-system, or scripts executed with a relative path in ./scripts.
To play well with Wurker, commands should exit with a non-zero exit code when encountering an error. Commands should exit with 0 if successful. In addition, commands may print error messages to stderr and the errors will be included in Wurker's log.
Service Config
Wurker and the Wurker UI run as systemd services. In addition, Wurker UI requires an nginx service.
After configuring Wurker and Bees, you may also configure the systemd services using the service command. Then either or both of wurker and wurker-ui services will be running in the background.
Their logs will be available using journalctl.
See the Service section for full details.
The following are only simple examples for pre-configured services:
wurk admin service wurker
wurk admin service ui
Usage
The usage documentation below applies to the CLI everywhere, and to the API where applicable.
CLI: The wurk command implements a command-line interface for all Wurker subcommands.
API: In addition, the wurker-ui service, when running, implements most Wurker subcommands.
- Administrative commands
admin stinger,admin seed,admin test,admin service, andrunare not implemented in the API. - All other commands are fully implemented in the API. Responses are in JSON, same as the CLI.
- The Wurker UI running on the Queen implements the API client to communicate with Drones (if any exist).
CLI Subcommands
Some subcommands are only available via the Command-Line Interface (CLI). In particular, you can only perform dependency injection, seed the database, configure services, and run Bees via the CLI.
Option: help
The wurk command itself has help, with wurk --help or wurk -h
And each nested subcommand has help, with wurk {SUBCOMMAND} -h
wurk help: wurk -h
Usage: wurk [OPTIONS] COMMAND [ARGS]...

  Wurker CLI - manage resources, definitions, and bees

Options:
  --version              Show the version and exit.
  --log [stderr|syslog]  Where to log (default: stderr).
  -h, --help             Show this message and exit.

Commands:
  add     Add Wurker definitions
  admin   Administrate Wurker resources
  edit    Edit Wurker definitions
  kill    Kill Wurker Bees
  remove  Remove Wurker definitions
  report  Report on Wurker Bees
  run     Run Wurker Bees
  show    Show Wurker definitions
Admin
The admin subcommand has a number of additional nested subcommands to manage Wurker resources.
wurk admin help: wurk admin -h
Usage: wurk admin [OPTIONS] COMMAND [ARGS]...

  Administrate Wurker resources

Options:
  -h, --help  Show this message and exit.

Commands:
  config   Configure local Wurker instance
  control  Reload or pause Wurker instance(s)
  init     Initialize schema and seed data for a new install
  seed     Seed Wurker database from Stinger
  service  Configure Wurker services
  status   Display Wurker status
  stinger  Manage injected Wurker resources
Config
The admin config subcommand allows the user to get, set, or reset Wurker configuration, as stored in the wurker.toml file.
wurk admin config help: wurk admin config -h
Usage: wurk admin config [OPTIONS] COMMAND [ARGS]...

  Configure local Wurker instance

Options:
  -h, --help  Show this message and exit.

Commands:
  get    Show config (empty for all, or 'table[.key]')
  reset  Reset etc/wurker.toml to default values
  set    Set config values like: table.key=value [table.key=value]
Get
The admin config get subcommand will retrieve all or any settings from the wurker.toml file.
wurk admin config get help: wurk admin config get -h
Usage: wurk admin config get [OPTIONS] [TABLE_KEY]

  Show config (empty for all, or 'table[.key]')

Options:
  -h, --help  Show this message and exit.
Set
The admin config set subcommand allows the user to modify the wurker.toml file without an editor.
wurk admin config set help: wurk admin config set -h
Usage: wurk admin config set [OPTIONS] [KEY_VALUES]...

  Set config values like: table.key=value [table.key=value]

Options:
  -h, --help  Show this message and exit.
Reset
The admin config reset subcommand will reset the wurker.toml file to the default settings.
wurk admin config reset help: wurk admin config reset -h
Usage: wurk admin config reset [OPTIONS]

  Reset etc/wurker.toml to default values

Options:
  -h, --help  Show this message and exit.
Init
The admin init subcommand allows the user to quick-start with default schema and data. May be safely run repeatedly, and allows a local user to set UI username and password until resting.
Init also hardens the install: any UI user still carrying the shipped default password gets a generated one, printed once; and an empty [ui] secret_key in wurker.toml is filled with a generated key, so UI sessions survive restarts and are shared across gunicorn workers.
Additional Stings and Seeds will be layered on top of defaults.
wurk admin init help: wurk admin init -h
Usage: wurk admin init [OPTIONS]

  Initialize schema and seed data for a new install

Options:
  --only [wurker|local]  Only initialize (or drop) the given database
  --drop                 Drop the given schema instead
  --no-status            Skip printing status after init
  --root TEXT            Path to root of stingers tree
  --slug TEXT            Stinger slug (default: 'default')
  --node TEXT            Colony node slug (default: 'queen')
  --env TEXT             Environment slug (default: 'local')
  --username TEXT        UI username to set in data/user.json
  --password TEXT        UI password to set in data/user.json
  -h, --help             Show this message and exit.
Stinger
Inject or extract configuration and/or dependencies into the Wurker instance.
This is the mechanism by which extremely modular CI/CD is accomplished without altering Wurker, itself.
See the Stingers section for a detailed discussion.
wurk admin stinger help: wurk admin stinger -h
Usage: wurk admin stinger [OPTIONS] COMMAND [ARGS]...

  Manage injected Wurker resources

Options:
  -h, --help  Show this message and exit.

Commands:
  extract   Extract resources from Wurker to a Stinger repository
  refactor  Refactor a legacy stinger tree
  resting   Re-inject resources from a Wurker Stinger repository
  sting     Inject resources from a Wurker Stinger repository
  unsting   Remove injected resources from Wurker
Sting
By default, the admin stinger sting subcommand with no options will install the test local Stinger that is bundled with Wurker in etc/stingers.
wurk admin stinger sting help: wurk admin stinger sting -h
Usage: wurk admin stinger sting [OPTIONS]

  Inject resources from a Wurker Stinger repository

Options:
  --root TEXT  Path to root of stingers tree (default: '/path/to/etc/stingers')
  --slug TEXT  Stinger slug (default: 'default')
  --node TEXT  Colony node slug (default: 'queen')
  --env TEXT   Environment slug (default: 'local')
  -h, --help   Show this message and exit.
The root path of the Stinger to use. This is usually installed as a sibling of Wurker. For example: --root ../wurker-stingers. But it may instead be an absolute path to a Stinger directory.
The Colony directory immediately beneath --root that should be used. This is needed because a Stinger may be used to configure multiple Colonies.
The Node directory immediately beneath --slug that should be used, if it exists. For example, queen/ or drone1/ are the usual node names.
The Environment directory immediately beneath --node that should be used, if it exists. For example, local, development or production are the usual environment names.
Unsting
The admin stinger unsting subcommand will delete the injected dependencies.
wurk admin stinger unsting help: wurk admin stinger unsting -h
Usage: wurk admin stinger unsting [OPTIONS]

  Remove injected resources from Wurker

Options:
  --drop-schema  Also drop database schema
  -h, --help     Show this message and exit.
If the --drop-schema flag is set, then the unsting subcommand will also drop the local and remote database tables and schemas.
Resting
The admin stinger resting subcommand will delete and then re-inject dependencies. Note that the options combine the sting and unsting subcommands.
wurk admin stinger resting help: wurk admin stinger resting -h
Usage: wurk admin stinger resting [OPTIONS]

  Re-inject resources from a Wurker Stinger repository

Options:
  --root TEXT    Path to root of stingers tree (default: '/path/to/etc/stingers')
  --slug TEXT    Stinger slug (default: 'default')
  --node TEXT    Colony node slug (default: 'queen')
  --env TEXT     Environment slug (default: 'local')
  --drop-schema  Also drop database schema
  -h, --help     Show this message and exit.
Extract
The admin stinger extract subcommand will create a Stinger directory tree and copy out injected resources into subdirectories of the Stinger tree.
The wurker subdirectories apply to all possible nodes, e.g., Queen and Drone(s).
The colony subdirectories apply only to the named node, e.g., queen or drone1.
wurk admin stinger extract help: wurk admin stinger extract -h
Usage: wurk admin stinger extract [OPTIONS] COMMAND [ARGS]...

  Extract resources from Wurker to a Stinger repository

Options:
  -h, --help  Show this message and exit.

Commands:
  colony  Extract resources to a 'colony' directory
  wurker  Extract resources to a 'wurker' directory
The admin stinger extract wurker subcommand will extract resources into a wurker directory.
wurk admin stinger extract wurker help: wurk admin stinger extract wurker -h
Usage: wurk admin stinger extract wurker [OPTIONS]

  Extract resources to a 'wurker' directory

Options:
  -r, --resource [requirements.txt|wurker.toml|seeds|models|bees|settings|settings/bees|lib|lib/mail|ssl|data]
                                  Which resources to extract (default: ALL)
  --root TEXT                     Path to root of stingers tree (default: '/path/to/etc/stingers')
  --slug TEXT                     Stinger slug (ex: 'default')  [required]
  --node TEXT                     Colony node slug (ex: 'queen')  [required]
  --env TEXT                      Environment slug (ex: 'local')  [required]
  -h, --help                      Show this message and exit.
The admin stinger extract colony subcommand works exactly like the wurker subcommand, but instead copies resources into a colony/{node}/{env} directory.
wurk admin stinger extract colony help: wurk admin stinger extract wurker -h
Usage: wurk admin stinger extract colony [OPTIONS]

  Extract resources to a 'colony' directory

Options:
  -r, --resource [requirements.txt|wurker.toml|seeds|models|bees|settings|settings/bees|lib|lib/mail|ssl|data]
                                  Which resources to extract (default: ALL)
  --root TEXT                     Path to root of stingers tree (default: '/path/to/etc/stingers')
  --slug TEXT                     Stinger slug (ex: 'default')  [required]
  --node TEXT                     Colony node slug (ex: 'queen')  [required]
  --env TEXT                      Environment slug (ex: 'local')  [required]
  -h, --help                      Show this message and exit.
Refactor
The admin stinger refactor command is a utility to help refactor legacy Wurker Stingers (<1.0.0) into new Stingers. It does two things:
- Moves seed files matching the legacy glob
seed_data_[0-9][0-9][0-9].jsonto the new format[0-9][0-9][0-9]_seed.json. - Converts legacy
.envconfiguration files towurker.toml.
wurk admin stinger refactor help: wurk admin stinger refactor -h
Usage: wurk admin stinger refactor [OPTIONS]

  Refactor a legacy stinger tree

Options:
  --root TEXT  Path to root of stingers tree (default:
               '/home/notroot/.config/wurker/stingers')
  -h, --help   Show this message and exit.
Note that wurk admin stinger refactor only accepts the --root argument. If there are multiple stingers, then it will refactor them all recursively.
Seed
The admin seed subcommand populates the database with pre-configured Commands, Crons, Bees, and Bee-Cron mappings.
It is safe to run admin seed or its options repeatedly. The same results will be reproduced, and existing seeds will be ignored. Wurker will keep track of the current Seed version until the schema is recreated, usually by the admin stinger sting subcommand.
Default seed JSON is included, with test Bees disabled.
wurk admin seed help: wurk admin seed -h
Usage: wurk admin seed [OPTIONS]

  Seed Wurker database from Stinger

Options:
  --only [wurker|local]  Only seed (or drop) the given database
  --drop                 Drop the given schema instead
  -h, --help             Show this message and exit.
Option: only
Only seed (or drop) the remote or local database.
Option: drop
A flag to drop the given database instead of seeding it. Like admin stinger unsting --drop-schema.
Service
Configure the systemd service files for wurker itself, as well as the wurker-ui web app, for the dashboard and API.
See Production for details on managing Wurker services.
wurk admin service help: wurk admin service -h
Usage: wurk admin service [OPTIONS] COMMAND [ARGS]...

  Configure Wurker services

Options:
  -h, --help  Show this message and exit.

Commands:
  ui      Configure Wurker UI service and Nginx config
  wurker  Configure Wurker service
Wurker
Configure and optionally install Wurker systemd service file.
wurk admin service wurker help: wurk admin service wurker -h
Usage: wurk admin service wurker [OPTIONS]

  Configure Wurker service

Options:
  --virtualenv TEXT  Root path of the Python venv to use (default: '/path/to/venv')
  --workingdir TEXT  Working directory for 'wurker' service (default: '/path/to/working/dir')
  -h, --help         Show this message and exit.
The root path of the Python virtualenv to use. By default, wurk will use the Python that it is running on.
Wurker's application root. By default, wurk will use its own app_root setting.
UI
Configure and optionally install Wurker UI systemd service and nginx configuration files.
wurk admin service ui help: wurk admin service ui -h
Usage: wurk admin service ui [OPTIONS]

  Configure Wurker UI service and Nginx config

Options:
  --virtualenv TEXT    Root path of the Python venv to use (default: '/path/to/venv')
  --workingdir TEXT    Working directory for 'wurker-ui' service (default: '/path/to/working/dir')
  --domain TEXT        Domain name for 'wurker-ui' virtual host (example: 'queen.example.com')
  --workers TEXT       Number of webserver workers (default: 3')
  --socket TEXT        Path to unix socket for 'wurker-ui' (default: '/tmp/wurker-ui.sock')
  --ssl-dir TEXT       Path to Nginx SSL certs for 'wurker-ui' (default: '/path/to/etc/nginx/ssl')
  --ssl-certs CRT KEY  Names of SSL certs for 'wurker-ui' (default: ('wurker.crt', 'wurker.key'))
  -h, --help           Show this message and exit.
The root path of the Python virtualenv to use. By default, wurk will use the Python that it is running on.
Wurker's application root. By default, wurk will use its own app_root setting.
Override the domain setting in wurker.toml. This value will be used in the nginx virtualhost file.
The number of webserver workers that will serve the Wurker UI.
The socket file used by the webserver (gunicorn) and proxy server (nginx).
The directory in which SSL files will be stored and referenced by nginx.
The basenames of the certificate file and private key file that will be used by nginx.
Install Services
The wurk admin service commands will generate systemd and nginx configuration files, but they must be installed by a system adminstrator.
For example:
# Generate systemd service file for wurker.service
wurk admin service wurker

# Copy into place
sudo cp $HOME/.config/wurker/systemd/wurker.service /etc/systemd/system/

# Generate systemd and nginx files for wurker-ui.service
wurk admin service ui --domain local.wurker.io

# Copy into place
sudo cp $HOME/.config/wurker/systemd/wurker-ui.service /etc/systemd/system/
sudo cp $HOME/.config/wurker/nginx/local.wurker.io.conf /etc/nginx/sites-available/
Status
The admin status subcommand simply collects and displays status information on the configured resources for the local Wurker instance, or a given Drone. As always, the output is JSON.
wurk admin status help: wurk admin status -h
Usage: wurk admin status [OPTIONS]

  Display Wurker status

Options:
  -d, --drone TEXT  Slugs or ID of drone(s) to control (repeatable)
  -h, --help        Show this message and exit.
Option: drone
A repeatable option to instead get and display the status from Drone(s).
Control
The admin control subcommand allows us to pause or reload the local Wurker instance, or a given Drone.
wurk admin control help: wurk admin control -h
Usage: wurk admin control [OPTIONS] {reload|pause}

  Reload or pause Wurker instance(s)

Options:
  -d, --drone TEXT  Slugs or ID of drone(s) to control (repeatable)
  -h, --help        Show this message and exit.
Option: drone
A repeatable option to instead get and display the status from Drone(s).
Test
Run the pytest unit test suite. This is equivalent to simply running pytest tests in the application root.
Note: You must sting and seed the default test resources to use this, or it will fail.
wurk admin test help: wurk admin test -h
Usage: wurk admin test [OPTIONS]

  Run unit tests on local Wurker resources

Options:
  -v, --verbose                   Run tests with verbosity
  -t, --testfile [test_00_core.py|test_01_show.py|test_02_add.py|test_03_edit.py|test_04_rm.py]
                                  Which test files to run (default: ALL)
  -h, --help                      Show this message and exit.
Option: verbose
Display the tests as they are executed.
Option: testfile
Repeatable option to run only the specified test files.
Run
Run one or more Wurker Bees, with optional filters.
Note: This subcommand has NO --drone option. To run a Bee on a Drone, instead add it to that Drone's on-demand queue.
To run all in the foreground, simply do: wurk run
wurk run help: wurk run -h
Usage: wurk run [OPTIONS] [[bee|cron|ondemand|scheduled|supervised]]

  Run Wurker Bees

Options:
  --slug TEXT  Filter by slug (only: cron, bee)
  -h, --help   Show this message and exit.
Option: slug
The slug of the Bee or Cron to run.
Subcommands
The other subcommands are available via CLI or API. Most API subcommands are also available via the UI in a more limited fashion.
All /api/* endpoints require authentication — the API is never anonymous, since it can define and trigger command execution. Two methods are accepted: a logged-in UI session (how the Dashboard's own JavaScript authenticates), or HTTP Basic auth against the api_auth users seeded from data/api_auth.json. If no api_auth users are configured, only session-authenticated requests are accepted. A Queen uses her own data/api_auth.json as client credentials when proxying requests to Drones, so Colony nodes should share matching api_auth entries. Note that Drones are addressed by their app_id in API routes (e.g. /api/drone/:app_id/status).
Admin Status
While most of the wurk admin subcommands are limited to CLI only, the wurk admin status subcommand is also available via API and UI.
Since Wurker works with JSON in every interface, you can pipe wurk into your favorite parser:
wurk admin status | jq
wurk admin status | python -m json.tool
Or, we can get the statuses of all of the Drones in the Colony, like so:
wurk admin status --drone
Or, we can get the status of a particular Drone.
wurk admin status --drone 3b4a40b6-7f1a-488e-b3ae-7dee9fc1b2cc
API Status
In addition, wurker-ui implements the status API resource to get the Queen or any Drone's status.
Retrieve the status JSON. If the target is a Queen, and she has Drones, then parts of their statuses will also be retrieved under the drone field.
GET http://:queen/api/status
In addition, we may request a Drone's status by making a by-proxy request to the Queen:
GET http://:queen/api/drone/:drone_id/status
Admin Control
Like the above, wurk admin control is also available via API and UI.
API Control
We can remotely run the control subcommand and reload or pause the Hive.
POST http://:queen/api/control/:action
Or, we can control one of the Queen's Drones:
POST http://:queen/api/drone/:drone_id/control/:action
Show
Display Wurker Commands, Bees, Crons, or Hive with optional filters.
To show all enabled scheduled or supervised Bees, do wurk show or wurk show all
wurk show help: wurk show -h
Usage: wurk show [OPTIONS]
                 [[all|bee|cron|command|ondemand|scheduled|supervised|hive]]

  Show Wurker definitions

Options:
  --slug TEXT       Filter by slug (only: command, cron, bee)
  -d, --drone TEXT  Slug or ID of drone(s) to show (repeatable)
  -h, --help        Show this message and exit.
The show subcommand is deceptively powerful. All the interfaces – CLI, UI, and API – use it to get data about Wurker objects. And the wurker.core.Wurkman class is the source of that data. This helps ensure that every interface retrieves the same data at a given moment.
Show All
The default for CLI show is to return JSON for all Bees, scheduled or unscheduled, enabled or disabled.
wurk show
API Show All
On the Queen:
GET http://:queen/api/show
On a Drone:
GET http://:queen/api/drone/:drone_id/show
Show List of Any Bees
In context, a Bee displayed by show will include computed metadata, such as timeout, cron, and module. Only the fields in wurker_bee are considered properties of a Bee.
On the Queen:
wurk show bee
On a Drone:
wurk show bee --drone $drone_id
API Show List of Any Bees
On the Queen:
GET http://:queen/api/show/bee
On a Drone:
GET http://:queen/api/drone/:drone_id/show/bee
Show One Bee
We filter for a single Bee (or Cron or Command) by using the --slug option.
Note: All filter results are JSON arrays, even if they only contain one item. If you're expecting one item, then look for index 0.
On the Queen:
wurk show bee --slug $bee_slug
On a Drone:
wurk show bee --slug $bee_slug --drone $drone_id
API Show One Bee
On the Queen:
GET http://:queen/api/show/bee/:bee_slug
On a Drone:
GET http://:queen/api/drone/:drone_id/show/bee/:bee_slug
Show Supervised
Supervised Bees are any Bee where the Bee is attached to a Cron, but the Cron has no schedule.
Techically, the Bee has an attached wurker_cron record where cron IS NULL.
In this case, we consider the Bee to be "Supervised", like supervisord. If the Bee dies for any reason, Wurker will restart it as soon as possible.
Supervised Crons may be named anything, but one named "Supervised" is created by default.
Note: Only enabled Bees will be displayed.
On the Queen:
wurk show supervised
On a Drone:
wurk show supervised --drone $drone_id
API Show Supervised
On the Queen:
GET http://:queen/api/show/supervised
On a Drone:
GET http://:queen/api/drone/:drone_id/show/supervised
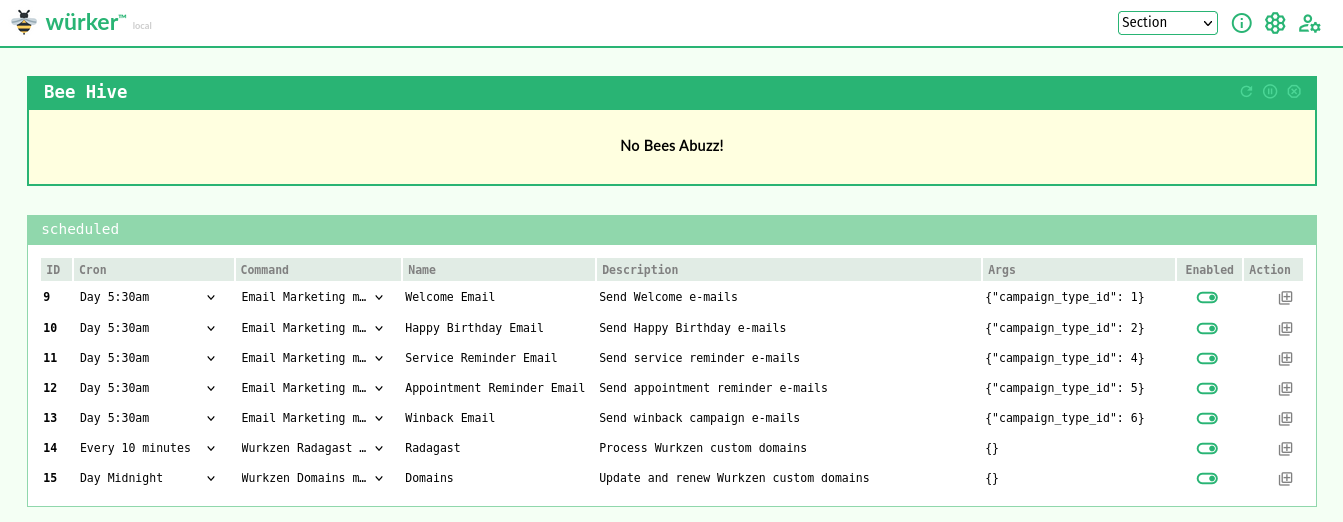
Show Scheduled
Scheduled Bees are any Bee that is attached to a Cron, where the Cron is scheduled.
Technically, the Bee has an attached wurker_cron record where cron is in valid cron format.
Wurker's scheduler runs on a 30-second loop, which means it can handle not only minutely cron scheduling, but it can update itself on both the "beat" and the "down-beat". This gives Wurker an ideal maximum of one minute on re-scheduling and on-demand updates. This cadence also limits database requests, and should guide user scheduling. There are no "seconds", here.
Note: Only enabled Bees will be displayed.
On the Queen:
wurk show scheduled
On a Drone:
wurk show scheduled --drone $drone_id
API Show Scheduled
On the Queen:
GET http://:queen/api/show/scheduled
On a Drone:
GET http://:queen/api/drone/:drone_id/show/scheduled
Show Ondemand
Any enabled Bee may be executed on demand. Any Orphaned, Supervised, or Scheduled Bees may, if enabled, also be used as Ondemand Bees.
This is a powerful capability of Wurker, which enables Colonies of related Nodes to operate in concert. A Queen may run Bees on demand, or tell her Drones to run ondemand Bees. Or both.
On the Queen:
wurk show ondemand
On a Drone:
wurk show ondemand --drone $drone_id
API Show Ondemand
On the Queen:
GET http://:queen/api/show/ondemand
On a Drone:
GET http://:queen/api/drone/:drone_id/show/ondemand
Show Hive
Show currently running Bees.
Note: You can also find these processes with ps or top.
On the Queen:
wurk show hive
On a Drone:
wurk show hive --drone $drone_id
API Show Hive
On the Queen:
GET http://:queen/api/show/hive
On a Drone:
GET http://:queen/api/drone/:drone_id/show/hive
Show Command
The wurk show command subcommand will display all the Wurker Command definitions, separate from any Bees they are assigned to.
Filter for all Commands on the Queen:
wurk show command
Or for one specific Command on the Queen:
wurk show command --slug $command_slug
Or for one specific Command on a Drone:
wurk show command --slug $command_slug --drone $drone_id
API Show Command
All Commands on the Queen:
GET http://:queen/api/show/command
Or for one specific Command on the Queen:
GET http://:queen/api/show/command/:command_slug
Or for one specific Command on a Drone:
GET http://:queen/api/drone/:drone_id/show/command/:command_slug
Show Cron
Likewise, the wurk show cron subcommand will display Wurker Cron definitions, separate from Bees.
Filter for all Crons on the Queen:
wurk show cron
Or for one specific Cron on the Queen:
wurk show cron --slug $cron_slug
Or for one specific Cron on a Drone:
wurk show cron --slug $cron_slug --drone $drone_id
API Show Cron
All Crons on the Queen:
GET http://:queen/api/show/cron
Or for one specific Cron on the Queen:
GET http://:queen/api/show/cron/:cron_slug
Or for one specific Cron on a Drone:
GET http://:queen/api/drone/:drone_id/show/cron/:cron_slug
Add
Add an an object to Wurker: a Command, Bee, or Cron to the configuration DB.
ondemand seems special, but isn't: it's a onetime Bee with custom arguments.
In addition, we may instead add the item to a Drone, using the --drone option.
Note: The add subcommand accepts as json input either a JSON file, or a JSON string.
CLI Add
The command-line add subcommand is powerful. It works with both file and string JSON inputs.
This can be used to add and map a new job on-the-fly.
wurk add help: wurk add -h
Usage: wurk add [OPTIONS] {bee|cron|command|ondemand} [INFILE]

  Add Wurker definitions

Options:
  -d, --drone TEXT  Slug or ID of drone(s) to add to (repeatable)
  -h, --help        Show this message and exit.
Adding a Command with a JSON file
Here we add a new command with slug example_command to wurker_command using a Linux redirect operator and a JSON file:
wurk add command < example_command.json
We can prove to ourselves that this worked with the subcommand: wurk show command --slug example_command
Adding a Cron with HEREDOC JSON
Here we add a new record with slug example_cron to wurker_cron using Linux HEREDOC notation and a JSON string:
wurk add cron <<EOF
{
  "name": "Example Cron",
  "slug": "example_cron",
  "cron": "*/15 * * * *"
}
EOF
We can prove to ourselves that this worked with the subcommand: wurk show cron --slug example_cron
Adding an Orphaned Bee with a JSON file
Here we add a new record with slug example_bee to wurker_bee using a Linux redirect operator and a JSON file:
wurk add bee < example_bee.json
We can prove to ourselves that this worked with the subcommand: wurk show bee --slug example_bee
Adding a Scheduled Bee with HEREDOC JSON
We can map a Bee to a Command and Cron at the same time as we add the Bee. Or we can add it orphaned, and then edit it to map it to a Cron, later.
wurk add bee <<EOF
{
  "name": "Example Bee",
  "slug": "example_bee",
  "description": "An example Bee that uses Example Command",
  "command_slug": "example_command",
  "cron_slug": "example_cron",
  "args": ["/"],
  "enabled": true
}
EOF
We can prove to ourselves that this worked with the subcommand: wurk show
Adding an Ondemand Bee with HEREDOC JSON
Here we add a Bee to the wurker_queue table.
wurk add ondemand <<EOF
["test_scheduled_bee"]
EOF
Adding an Ondemand Bee with Custom Args
Here we add an ondemand Bee with custom args.
Note: we use a JSON array for args to external Bees, not an object.
wurk add ondemand <<EOF
[{"test_scheduled_bee": ["-l", "/tmp/default-logfile.log"]}]
EOF
Now we add an ondemand PyBee with custom kwargs.
Note: we use a JSON object for keyword args to internal PyBees, not an array.
wurk add ondemand <<EOF
[{"test_scheduled_pybee": {"log": "/tmp/default-logfile.log"}}]
EOF
API Add
The API add endpoint is equally powerful. We can do via API to Queen or Drone all of the things we did via CLI. The JSON is exactly the same.
Add Command
Wurker does not validate the existence of Commands. Instead, expect runtime errors when running invalid Commands as a Bee.
POST http://:queen/api/add/command
Content-Type: application/json

{
  "slug": "dummy_command",
  "name": "Dummy Command",
  "description": "A dummy command that runs `ls $args`",
  "command": "/usr/bin/ls",
  "is_module": false
}
We can validate that the Command was created by calling the show endpoint:
GET http://:queen/api/show/command/dummy_command
On a Drone:
POST http://:queen/api/drone/:drone_id/add/command
Content-Type: application/json

{
  "slug": "dummy_command",
  "name": "Dummy Command",
  "description": "A dummy command that runs `ls $args`",
  "command": "/usr/bin/ls",
  "is_module": false
}
Add Cron
Suppose we want to run dummy_bee every 18 minutes. We don't have an existing Cron for that, or we could use it. Instead, we'll add a new Cron for our dummy.
POST http://:queen/api/add/cron
Content-Type: application/json

{
  "name": "Every 18 minutes",
  "slug": "dummy_cron",
  "cron": "*/18 * * * *"
}
We can check that new Cron exists using the show command, again:
GET http://:queen/api/show/cron/dummy_cron
On a Drone:
POST http://:queen/api/drone/:drone_id/add/cron
Content-Type: application/json

{
  "name": "Every 18 minutes",
  "slug": "dummy_cron",
  "cron": "*/18 * * * *"
}
Add Bee
Now that we have created dummy_command and dummy_cron, we can add a Bee to use them.
Note that we use the pseudo-fields command_slug and cron_slug instead of IDs. This makes it much easier to map Bees to Commands and Crons.
POST http://:queen/api/add/bee
Content-Type: application/json

{
  "name": "Dummy Bee",
  "slug": "dummy_bee",
  "description": "A dummy Bee that uses Dummy Command",
  "command_slug": "dummy_command",
  "cron_slug": "dummy_cron",
  "args": ["/"],
  "enabled": true
}
And again we validate with the show endpoint:
GET http://:queen/api/show/bee/dummy_bee
On a Drone:
POST http://:queen/api/drone/:drone_id/add/bee
Content-Type: application/json

{
  "name": "Dummy Bee",
  "slug": "dummy_bee",
  "description": "A dummy Bee that uses Dummy Command",
  "command_slug": "dummy_command",
  "args": ["/"],
  "enabled": true
}
Add Ondemand
Any Bee can be run as ondemand as long as it is enabled. Let's queue our Dummy Bee to run. The add ondemand endpoint expects a JSON array of Bee slugs to queue.
POST http://:queen/api/add/ondemand
Content-Type: application/json

["dummy_bee"]
We can confirm that our Bee was queued by showing the ondemand Bees:
GET http://:queen/api/show/ondemand
On a Drone:
POST http://:queen/api/drone/:drone_id/add/ondemand
Content-Type: application/json

["dummy_bee"]
Edit
Edit one Command, Bee, or Cron in the configuration DB.
In addition, we may edit an item on a Drone, by using the --drone option.
CLI Edit
The edit subcommand also expects JSON as the primary argument.
Works similarly to wurk add, and accepts HEREDOC or JSON file as input.
wurk edit help: wurk edit -h
Usage: wurk edit [OPTIONS] {bee|cron|command} KEY [INFILE]

  Edit Wurker definitions

Options:
  -d, --drone TEXT  Slug or ID of drone(s) to edit on (repeatable)
  -h, --help        Show this message and exit.
Altering a Command with HEREDOC JSON:
We can change the description of our example_command from earlier:
wurk edit command example_command <<EOF
{"description": "An edited description"}
EOF
We can prove to ourselves that this worked with the subcommand: wurk show command
Enabling a Bee with HEREDOC JSON:
This can be used to enable our example_bee from earlier:
wurk edit bee example_bee <<EOF
{"enabled": true}
EOF
We can prove to ourselves that this worked with the subcommand: wurk show scheduled
Re-map a Bee with HEREDOC JSON:
This can be used to reschedule our example_bee to minutes_1:
wurk edit bee example_bee <<EOF
{"cron_slug": "minutes_1"}
EOF
We can prove to ourselves that this worked with another: wurk show scheduled
API Edit
Editing via API uses the same JSON as the CLI.
Edit Command
Let's switch from the useless ls command to something equally useless, touch.
POST http://:queen/api/edit/command/dummy_command
Content-Type: application/json

{
  "name": "Dummy Command Changed",
  "description": "Now it runs `touch $args`",
  "command": "/usr/bin/touch"
}
And we validate as usual:
GET http://:queen/api/show/command/dummy_command
On a Drone:
POST http://:queen/api/drone/:drone_id/edit/command/dummy_command
Content-Type: application/json

{
  "name": "Dummy Command Changed",
  "description": "Now it runs `touch $args`",
  "command": "/usr/bin/touch"
}
Edit Bee
We can edit the Bee, too.
Note we can edit the Command or Cron mapping with this endpoint by using the command_slug and cron_slug pseudo-fields.
POST http://:queen/api/edit/bee/dummy_bee
Content-Type: application/json

{
  "name": "Dummy Bee Changed",
  "args": ["/tmp/dummy-touched"],
  "command_slug": "dummy_command",
  "cron_slug": "supervised"
}
And again validate:
GET http://:queen/api/show/bee/dummy_bee
As you can see, it could be easy to break Bees this way. What did we do wrong? The args belong to the Bee, and they don't match the expected arguments for the test_bee Command. We can either change the Bee's arguments, or revert. Let's revert and move on.
POST http://:queen/api/edit/bee/dummy_bee
Content-Type: application/json

{"command_slug": "dummy_command"}
On a Drone:
POST http://:queen/api/drone/:drone_id/edit/bee/dummy_bee
Content-Type: application/json

{
  "name": "Dummy Bee Changed",
  "args": ["/tmp/dummy-touched"],
  "command_slug": "dummy_command"
}
Edit Cron
We can also edit crons. This is useful if you use generic names and slugs like we did: dummy_cron could be anything, right? Let's change the underlying cron schedule from 18 minutes to 30.
POST http://:queen/api/edit/cron/dummy_cron
Content-Type: application/json

{
  "name": "Every 30 minutes",
  "cron": "*/30 * * * *"
}
And verify:
GET http://:queen/api/show/cron/dummy_cron
On a Drone:
POST http://:queen/api/drone/:drone_id/edit/cron/dummy_cron
Content-Type: application/json

{
  "name": "Every 30 minutes",
  "cron": "*/30 * * * *"
}
Remove
Remove one Bee, Cron or Map from the configuration DB.
Alternatively, remove the item from a Drone, using the --drone option.
CLI Remove
wurk remove help: wurk remove -h
Usage: wurk remove [OPTIONS] {bee|cron|command|ondemand} KEY

  Remove Wurker definitions

Options:
  -d, --drone TEXT  Slug or ID of drone(s) to remove from (repeatable)
  -h, --help        Show this message and exit.
Remove a Command:
We can delete a command, but it will possibly break any Bees attached to it, so be careful. Here we delete our unattached command from earlier:
wurk remove command example_command
We can prove to ourselves that this worked with the subcommand: wurk show command
Remove a Cron:
We can remove the minutes_15 Cron we created earlier, like:
wurk remove cron minutes_15
We can prove to ourselves that this worked with the subcommand: wurk show cron
Remove a Bee:
We can remove the example_bee Bee we created earlier, like:
wurk remove bee example_bee
We can prove to ourselves that this worked with the subcommand: wurk show bee
API Remove
Removal of objects depends on relationships. If foreign keys constrain deletion, then an error will result. Instead remove the relationship first, and then remove the object.
Let's remove everything we created in this section of the documentation: Command, Bee, and Cron. We work backwards following relationships.
Remove Cron
Now that there's no wurker_bee scheduled, we can safely delete dummy_cron.
POST http://:queen/api/remove/cron/dummy_cron
And, confirm:
GET http://:queen/api/show/cron
On a Drone:
POST http://:queen/api/drone/:drone_id/remove/cron/dummy_cron
Remove Ondemand
Even if an ondemand Bee is running, the queue item may be removed with this command.
POST http://:queen/api/remove/ondemand/radagast
On a Drone:
POST http://:queen/api/drone/:drone_id/remove/ondemand/radagast
Remove Bee
Now that the Bee is orphaned, it can be safely deleted.
POST http://:queen/api/remove/bee/dummy_bee
On a Drone:
POST http://:queen/api/drone/:drone_id/remove/bee/dummy_bee
Remove Command
Finally, we can delete the Dummy Command, since nothing depends on it, now.
POST http://:queen/api/remove/command/dummy_command
On a Drone:
POST http://:queen/api/drone/:drone_id/remove/command/dummy_command
Kill
Kill one or more running Wurker Bees, with optional filters.
To kill all running either in the background, or in the foreground in another terminal, simply do: wurk kill
In addition, we may use the --drone option to kill a Bee running on all or some Drones.
Kill is asynchronous: the CLI or API enqueues the request in wurker_kill_queue and returns immediately. The Wurker daemon (which owns the Bee subprocesses' PID namespace) drains the queue on its next control tick and performs the actual kill within a few seconds. This is the only correct model when the CLI/UI and the daemon run in different processes — including single-host installs, systemd services, and multi-container Docker deployments.
Note: killing a supervised Bee only takes it down until the next supervisor tick, which will restart it (that is the definition of supervised). To take a supervised Bee out of service, disable it first (wurk edit bee <slug> with {"enabled": false}), then kill.
CLI Kill
wurk kill help: wurk kill -h
Usage: wurk kill [OPTIONS] [[bee|cron|ondemand|scheduled|supervised|hive]]

  Kill Wurker Bees

Options:
  --slug TEXT       Filter by slug (only: cron, bee)
  -d, --drone TEXT  Slug or ID of drone(s) to kill on (repeatable)
  -h, --help        Show this message and exit.
API Kill
Kill enqueues a signal for the daemon; the endpoint returns as soon as the row is written (typically HTTP 200). If no Bees match the target when the daemon drains the queue, the daemon logs it and moves on — the enqueue itself does not fail.
Kill Hive
You can either send the command with no option:
POST http://:queen/api/kill
Or with the hive option:
POST http://:queen/api/kill/hive
On a Drone:
POST http://:queen/api/drone/:drone_id/kill
Kill Cron
You can kill every Bee in a particular Cron:
POST http://:queen/api/kill/cron/minutes_1
On a Drone:
POST http://:queen/api/drone/:drone_id/kill/cron/minutes_1
Kill Bee
You can kill a particular Bee:
POST http://:queen/api/kill/bee/supervised_test_bee
On a Drone:
POST http://:queen/api/drone/:drone_id/kill/bee/supervised_test_bee
Kill Cron Type
You can kill any one of ondemand, supervised, or scheduled by adding the keyword:
POST http://:queen/api/kill/ondemand
On a Drone:
POST http://:queen/api/drone/:drone_id/kill/ondemand
Advanced
Users may implement more advanced functionality, such as dependency injection ("Stingers") and/or distributed processing ("Colonies"). Both features work by leveraging Wurker structured dependency trees that the wurk admin stinger sting subcommand can parse and inject into a Wurker instance.
Seeds
Seed files are JSON files that used to migrate data without dropping the remote database schema. Seed files can be used to add, update, or delete zero or more Commands, Crons, Bees, and/or Maps.
A Seed file is a JSON object with at least one of wurker_command, wurker_cron, wurker_bee, or wurker_bee_cron items. All of these are JSON arrays containing objects, except wurker_bee_cron, which is an object.
See Default Seed JSON for a real example of adding and scheduling Commands, Crons, and Bees.
See Seed JSON Schema for a formal declaration that can be used to validate Seed JSON data.
Writing Add Seeds
All of an item's fields are required when adding with a Seed file.
This is a valid declaration for a Command and a Bee that can be run on-demand, but is not scheduled:
{
  "wurker_command": [
    {
      "name": "List Directory (ls)",
      "slug": "list_dir",
      "description": "The bog-standard `ls` command.",
      "command": "/usr/bin/ls",
      "is_module": false
    }
  ],
  "wurker_bee": [
    {
      "name": "List My Files",
      "slug": "list_my_files",
      "description": "List files in my home directory.",
      "command_slug": "list_dir",
      "args": ["-hal","/path/to/my/files"],
      "enabled": true
    }
  ]
}
Writing Update Seeds
Only the slug field is required when updating with a Seed file. The slug cannot be changed via this method, but any other field may be.
For example, to disable the Bee we added in the previous example, we can do:
{
  "wurker_bee": [
    {
      "slug": "list_my_files",
      "enabled": false
    }
  ]
}
Writing Delete Seeds
To delete an item, simply include the slug field and the optional delete directive.
For example:
  {
  "wurker_bee": [
    {
      "slug": "list_my_files",
      "delete": true
    }
  ]
}
Stingers
Stingers are a powerful tool that may include Seeds, as well as additional dependencies to be injected, like PyBee modules, custom DB models, custom Python libraries, etc.
The Seeds permit us to declare a complete configuration for all our Commands, Crons, and Bees that are injected during the sting operation.
The wurk admin stinger sting options should be familiar concepts, by now:
ROOT: Required: the root of the Stingers you want to choose from.SLUG: Required: the directory of the Stinger you want to inject.NODE: Optional: the directory of the node (queen,drone1,drone2, etc) you want to inject.ENV: Optional: the directory of the environment (production,development, etc) you want to inject.
Default Stinger
The default etc/stingers is the simplest example of a Stinger containing only one Seed JSON file for test Bees, and a default user.json for Wurker UI. It uses the default etc/wurker.toml settings, and this is what is injected when running wurk admin stinger sting with no options.
etc/stingers/
└── default
    ├── colony
    │   └── queen
    │       └── local
    │           └── data
    │               └── user.json
    └── wurker
        └── seeds
            └── 000_seed.json
The default Stinger is always injected when running the wurk admin stinger sting command, even if additional Stingers are injected. This allows us to layer Stingers.
Let's review the above structure:
ROOTisetc/stingers/, the default forwurk admin stinger stingsubcommand.SLUGisdefault, the default forwurk admin stinger sting.NODEisqueenandENVislocal, the defaults forwurk admin stinger sting.
Stinger Schema
The basic required structure of a single Stinger follows a hierarchical convention. The wurker sub-tree in the following diagram shows the allowed files and directories for a "Wurker dependency tree".
Note: Not all resources are required in a Stinger. Just the ones you want to inject. However, it must have this structure and use these file and directory names.
ROOT
└── SLUG
    └── wurker
        ├── wurker.toml
        ├── requirements.txt
        ├── bees
        │   ├── *.py
        │   └── dispatchers
        │       └── *.py
        ├── models
        │   └── *.py
        ├── seeds
        │   └── *.py
        ├── settings
        │   ├── *.py
        │   └── bees
        │       └── *.py
        ├── lib
        │   ├── *.py
        │   └── mail
        │       └── *.py
        ├── ssl
        │   └── *.*
        └── data
            └── *.*
The extended optional structure, including the use of colony directory, allows us to layer dependency trees.
We may include any parts of the previous example's wurker sub-tree that we want to apply to all nodes and environments, and then override or extend the dependency tree with more specific NODE and ENV directives.
In the following example, we inject:
bees,modelsandsettingsfromROOT/SLUG/wurker/so it applies to anyNODEorENV.wurker.tomlfromROOT/SLUG/colony/NODE/ENV/so it applies only toNODE/ENV. For example, "queen/production".001_seed.jsonfromROOT/SLUG/colony/NODE/wurker/seeds/so it applies to anyENVinNODE. This is helpful if you want to inject the same Seeds into both production and development, for example.
ROOT
└── SLUG
    ├── wurker
    │   ├── bees
    │   │   └── dispatchers
    │   │       └── *.py
    │   ├── models
    │   │   └── *.py
    │   └── settings
    │       └── *.py
    └── colony
        └── NODE
            ├── ENV
            │   └── wurker.toml
            └── wurker
                └── seeds
                    └── 001_seed.json
Finally, note that any or only some of the "Wurker dependency tree" may be in any of the wurker type directories. We can have bees under ENV for environment-specific Bees. Or models under NODE/wurker for Queen-only database. Mix-and-match as needed.
In the next section, we'll show how Stingers allow us to declare a multi-host Colony.
Colonies
Colonies are Wurker clusters: multiple hosts (hardware or virtual machines) running in tandem.
Each separate host in a Colony runs a Wurker instance, identified by the app_id in the wurker.toml file. All nodes in a Colony share the same database schema. Only one of these instances in the Colony can be the Queen. The others are Drones.
Stingers make it much easier to declare Queens and Drones, and when used in conjunction with version control and a CI/CD system, they provide a highly reproducible solution to scaling Wurker on conventional, low-cost cloud infrastructure.
Consider the final example from the previous section on Stingers, and note the colony directory.
Like the wurker directory, the colony slug is special. It indicates that one or more NODE directories will be found inside. And each NODE directory may have a wurker directory, or one or more ENV directories. Or both wurker and ENV directories.
Example Colony
An example will be illustrative.
Suppose we have a Bee called process_data that we want to scale. We want to partition the inputs between two hosts and have each of them process half the data. Also assume we're writing process_data as a PyBee, and it's not an external command or script (Stingers cannot inject these).
Let's take inventory of what we'll need.
- We will need three hosts, each with their own App ID: the Queen and two Drones,
drone1anddrone2. - We will need a special Dispatcher Bee: a callback function that can partition the inputs and dispatch the Drones to run
process_data. - We will need a database connection and models to get the input keys to partition.
- We will need the
process_dataPyBee, itself.
The structure of a Stinger for this Colony, here called main, might look like the following:
stingers/
└── main
    ├── colony
    │   ├── drone1
    │   │   ├── development
    │   │   │   └── wurker.toml
    │   │   ├── production
    │   │   │   └── wurker.toml
    │   │   └── wurker
    │   │       ├── bees
    │   │       │   └── process_data.py
    │   │       └── seeds
    │   │           └── 001_seed.json
    │   ├── drone2
    │   │   ├── development
    │   │   │   └── wurker.toml
    │   │   ├── production
    │   │   │   └── wurker.toml
    │   │   └── wurker
    │   │       ├── bees
    │   │       │   └── process_data.py
    │   │       └── seeds
    │   │           └── 001_seed.json
    │   └── queen
    │       ├── development
    │       │   └── wurker.toml
    │       ├── production
    │       │   └── wurker.toml
    │       └── wurker
    │           ├── bees
    │           │   └── dispatchers
    │           │       └── cb_process_data.py
    │           └── seeds
    │               └── 001_seed.json
    └── wurker
        ├── models
        │   └── custom.py
        └── settings
            └── custom.py
Let's look closer. Notice that the Queen doesn't need process_data.py because her only job is to dispatch the process_data Bees to her two Drones. She only needs the Dispatcher Bee, cb_process_data.py.
Also, the Queen "knows" how many Drones she has to work with, so when she adds the process_data Bees to her Drones' ondemand queues, she can supply the correct wurker_queue.args so that each Drone only processes the data that she wants them to.
That means the Queen and Drones will have different Seeds, as well. The Queen needs to seed a Bee called dispatch_drones that runs the Dispatcher. The Drones need to run process_data, itself.
Despite all these differences between Queens and Drones, it's further complicated because we need production and development environments, with different Wurker databases. That's why the wurker.toml files are separate from each node's wurker tree.
Finally, all of the above need access to the custom database connection and models, so these we put in the top-level wurker directory to share with the rest of the Stinger.
Docker Dev Colony
The docker/ directory in the Wurker Hatchery repository provides a ready-made local Colony for development and testing. It runs a full Queen + Drone topology backed by PostgreSQL inside Docker, with live source reloading so that changes to src/ take effect immediately without rebuilding the image.
Prerequisites
- Docker and Docker Compose (v2)
- The repository checked out locally
Services
The compose stack brings up five containers from a single wurker-colony:local image:
| Service | Role |
|---|---|
db |
PostgreSQL 15; shared remote DB for all Colony nodes |
queen-ui |
Queen node: runs wurk admin init then wurker-ui on port 5000 |
queen-worker |
Queen worker: runs wurk run against the Queen config |
drone1-ui |
Drone1 node: runs wurk admin init then wurker-ui (port 5000, mapped to host 5001) |
drone1-worker |
Drone1 worker: runs wurk run against the Drone1 config |
The Queen and Drone UI containers each run wurk admin init on startup to apply Stinger config, run Alembic migrations, and seed the database before starting the Flask server. The workers wait for their paired UI container to pass its healthcheck before starting.
Directory Layout
docker/
├── Dockerfile              # Single image used by all services (ARG DEV=1 for editable install)
├── docker-compose.yml      # Dev: bind-mounted src/, FLASK_DEBUG=1, host runtime dirs
├── docker-compose.prod.yml # Prod: named volumes, no live reload
├── stingers/               # Stinger tree injected into each container at startup
│   └── default/
│       └── colony/
│           ├── queen/
│           │   └── local/
│           │       ├── wurker.toml   # Queen config (is_queen=true, Postgres remote DB)
│           │       └── data/
│           │           └── user.json # Default UI credentials
│           └── drone1/
│               └── local/
│                   └── wurker.toml  # Drone config (is_queen=false, same Postgres remote DB)
└── runtime/                # Created on first run; gitignored except for .gitkeep
    ├── queen/              # Bind-mounted to /config inside queen-ui and queen-worker
    └── drone1/             # Bind-mounted to /config inside drone1-ui and drone1-worker
Starting the Colony
From the docker/ directory:
# First run — build the image and start all services
docker compose up --build

# Subsequent runs
docker compose up

# Reset databases and re-seed (useful after schema changes or seed updates)
docker compose up --force-recreate
The dev compose file bind-mounts ../src into each container as /app/src and installs the package in editable mode (pip install -e), so any change to src/ is picked up by Werkzeug's inotify reloader automatically.
Note that wurk CLI commands inside the containers require --log stderr because Docker containers do not have syslog:
docker compose exec queen-ui wurk --log stderr show
docker compose exec drone1-ui wurk --log stderr status
Accessing the UI
| URL | Node |
|---|---|
http://localhost:5000 |
Queen dashboard |
http://localhost:5001 |
Drone1 dashboard |
Log in with the dev credentials wurkeradmin / wurkerdev, which the compose file passes explicitly to wurk admin init (admin init never leaves the shipped default password in place — without an explicit --password it generates one and prints it once in the container logs). The Queen dashboard's node selector lets you switch to the Drone view, which proxies API calls through the Queen.
API requests between nodes (and any curl testing you do against /api/*) authenticate with HTTP Basic auth using the dev credentials in docker/stingers/default/colony/*/local/data/api_auth.json.
Production Compose
docker-compose.prod.yml is a production-oriented variant: it uses named Docker volumes instead of host bind mounts, omits the src/ overlay, omits FLASK_DEBUG, and does not pass --recreate to wurk admin init (so it is safe to restart without wiping the database).
The prod variant does not set UI credentials, so on first boot admin init generates a password for wurkeradmin and prints it once — read it from the queen-ui container logs (docker compose -f docker-compose.prod.yml logs queen-ui) and store it.
docker compose -f docker-compose.prod.yml up --build
Deployment
Every Wurker instance may serve an API, and it may also serve the Wurker Dashboard UI, if it's a Queen.
Development
To run the API (and, if Queen, the GUI) in development mode, simply do:
wurker-ui run -h 0.0.0.0
Then browse to the IP address of the host, and login for GUI, or make requests to the API endpoints.
Production
Production deployments may use any suitable WSGI server and reverse proxy. Here, we describe how to deploy using Gunicorn and nginx.
Requirements and Dependencies
The Gunicorn WSGI server requirement is included in Wurker's pyproject.toml file, installed by pip.
Nginx is a system dependency, and may be installed on Debian-based Linux like:
sudo apt install nginx
Or on Enterprise Linux like:
sudo yum install nginx
In addition, Wurker is designed to run on Linux with systemd. It currently does not support other init systems out of the box.
Start nginx Service
We also use systemd to run nginx. Simply do:
sudo systemctl enable nginx
sudo systemctl start nginx
Then validate that it's running with the command:
systemctl status nginx
When in doubt, restart:
sudo systemctl restart nginx
Configure and Install Services
First use Wurker to install services using Service.
Once your service and nginx config files are installed, you still need to enable the wurker-ui web site:
cd /etc/nginx/sites-enabled
sudo ln -s /etc/nginx/sites-available/<NAME_OF_YOUR_FILE> .
Versions
Wurker versioning follows the MAJOR.MINOR.BUILD convention, enforced as a Waterfall during the startup phase.
The Version file should be maintained in coordination with this document. Likewise, the Change Log should be maintained to reflect releases.
Startup Versioning
During the startup phase, all versions were considered BUILD versions until feature completeness is achieved.
That means we set MAJOR = 0 and MINOR = 0 for all early versions.
Versioning
After v1.0.0, apply the following criteria when determining which version value to increment:
MAJOR: A new subcommand or integration is added, or major code revisions have occurred. Increment rarely.MINOR: Any release candidate that has been deemed "production-ready". Increment often.BUILD: For development use only. It should be excluded in releases, except released patches.
The road map items should be moved to the Change Log as they are completed.
Road Map (0.1 to 1.0)
Version 1.0 will permit a period of incremental refinement of existing features.
Pull Requests will be encouraged from open source engineers.
Refinement priorities and bugs should be tracked below, as they appear.
Enhancements from version 2.0 may be moved to 1.0 on a case-by-case basis.
Publish
Create a PyPi repository and setup sufficient for pip install wurker. Publish documentation.
Restructure Source Code
Publishing requires adhering to packaging standards. We'll use good ole setuptools. There are multiple considerations when performing code restructuring and refactoring in this way:
Execution of wurk command from CLI will be after package installation, not local. This means:
Mutable resources should be separated from the installed package. Use /opt/wurker/ to create a Linux-standard tree, including bin, lib, etc, data, and bees.
Install a runner script to /usr/bin/wurk and possibly /sbin. The purpose is to be able to run wurk or sudo wurk as commands on the $PATH.
Enhance CLI
Wurker currently uses the built-in argparse library for the CLI, but it has limitations. Flask is bundled with Click, a better CLI library that allows nested subcommands. We should switch to Click.
Enhance Configuration
- Add optional
wurk admin configcommand for basic interactive configuration. - Add additional database support (PostgreSQL, MSSQL, etc) via SQLAlchemy.
Road Map (>= 2.0)
With all of the elements in place, we can now begin to extend, adapt, and abstract various elements of the Wurker platform toward enterprise maturity. These lessons will have to be learned during the course of v2.0 development, so that the next phase can be implemented. However, some predictions are obvious:
- CI/CD Deployment - Targeting popular platforms like Jenkins, GitLab, etc.
- Git Integration - Remote Stingers for dependency and secret injection and extraction.
- Colony Orchestration - Deploy a Wurker Colony via Kubernetes or Docker Compose.
- Serverless PyBees - Run Lambda PyBees. Why not? They're just a
run()function. - Message Queue Integration - Receive requests via MQ, and subscribe/publish via PyBees.
Enhance Exports
Currently, sting --export-wurker and sting --export-colony are very limited and not intuitive. The CLI enhancements should fix the latter. The former challenge is more complicated, and subject to finalization of the Stinger overlay schema. Moreover, there is what we might call the "Git Synchrony Problem" with the local Stinger directory: it requires manual steps even when using one of the sting --export-* options.
Focus for v2 should be threefold:
- Ease-of-Use: the CLI should be intuitive and powerful
- Exporting Seeds: possibly with Git integration
- Git integration: allow setting Stinger root, including remote root, a'la
git remote add-url
Finalizing Stingers should be organic: when the schema stops changing, then call that "final".
Log Aggregation
Wurker CLI and UI should permit aggregate log viewing and filtering, for all the nodes in a Colony. This may be enabled via GELF publishing, and perhaps using a new wurker-logs service on the Queen only that subscribes to the Drones' publish events.
In addition, log items should include enough data to join with Wurker Report data. In Wurker UI, the user should be able to click to view logs pre-filtered for Bee, Cron, Command. In Reports, the user should be able to click to view logs for that particular run on that particular node, filtering by PID to get specific logs.
Report Archiving
- Allow Report data to be archived to CSV locally or to a CDN like S3.
- Bee or Cron deletions should trigger automatic archival prior to cascade (refactor to use soft-cascade).
Enhance UI Authorization
Currently, Wurker UI users have no roles. Everyone is an admin. Implement an ACL with an eye toward future enterprise auth integration. For example a user may want to use Active Directory to login and monitor Bees on a display. An admin may want to edit Bees or other objects. This will be trivial if we already have a compatible ACL deployed.
Enhance Unit Tests
Currently, the wurk test subcommand runs unit tests only for Wurker, itself.
As a PyBee developer, I also want to inject unit tests for my PyBees in my Stinger. These tests should be executed when running wurk test.
Change Log
All notable changes to this project will be documented in this file.
The format is based on Keep a Changelog and this project adheres to Semantic Versioning.
v0.1.30 - 2026-07-09
Security:
- The
/api/*endpoints now fail closed: authentication is always required, via a logged-in UI session (used by the Dashboard's own JavaScript) or HTTP Basic auth againstapi_authusers. Previously an emptyapi_authtable left the entire API — which can define and trigger command execution — publicly accessible wurk admin initreplaces the shipped defaultwurkeradminpassword with a generated one, printed once at the end of init; explicit--username/--passwordstill take precedencewurk admin initgenerates and persists[ui] secret_keyinwurker.tomlwhen empty; previously each gunicorn worker generated its own random Flask secret at import time, so UI sessions randomly bounced between workers and died on every restart
Changed:
wurk killis now asynchronous end-to-end: the CLI/API enqueues a request in the newwurker_kill_queuetable, and the daemon (which owns the Bee subprocesses' PID namespace) drains the queue every 3 seconds and performs the actual kill. This is the only correct model when the CLI/UI and daemon run in different processes — including single-host installs, systemd services, and multi-container Docker deployments- Alembic migration
c7d9e2f4a801adds thewurker_kill_queuetable (portable across SQLite, Postgres, and MySQL 8; noRETURNINGdependency) - Bundled Lato webfonts trimmed to the four faces the UI actually uses (Medium/Bold, normal + italic, woff2 only), shrinking the wheel from 19 MB to 1.2 MB
- The Docker dev Colony seeds
data/api_auth.jsonon both nodes (Queen→Drone proxy credentials) and passes explicit dev UI credentials (wurkeradmin~/~wurkerdev) toadmin init
Fixed:
- Every
wurk killvariant (CLI,/api/kill, and the Hive dashboard's kill icons) was a silent no-op on every deployment:KillCommandbuilt its ownWurkmanin the caller's process, whoseBeeobjects had no liveprochandle, soBee.kill()hit its no-proc branch and returned. Rewritten to enqueue instead; see the Changed entry above - The UI Hive dashboard's kill icons dispatched
data-action="kill", butcommon.js'saction()router only hadadd~/~removecases and dropped the event with no log or error. Added akill()path that POSTs to/api/kill/<option>/<key>with a confirm dialog wurker_bee_report.updated_atnever updated on Postgres or SQLite: the column used MySQL-onlyON UPDATE CURRENT_TIMESTAMPDDL; replaced with a portable ORM-levelonupdate- Debug logging cleanup: removed stray
print()calls from the UI index view and debugconsole.lognoise from the Dashboard JavaScript; demoted full-hive log dumps to DEBUG level - The JSON args editor validated PyBee args against the wrong rule due to a
datasettypo (ismoqqdule); PyBee (module) args are now correctly required to be JSON Objects
v0.1.27 - 2026-07-08
Added:
docker/directory with a local Colony development environment: Dockerfile,docker-compose.yml(dev, with live source reloading),docker-compose.prod.yml(prod, with named volumes), and astingers/default/tree pre-configured for a Queen + Drone1 Colony backed by Postgreswurk runnow installs a SIGTERM handler that exits through the normal STOP path, sodocker stop/systemctl stopkills running Bees cleanly and finalizes their reports (previously the process died instantly, leaving reports stuck in PROCESSING)
Changed:
- Operator-initiated shutdown (stop, pause, reload) now reports supervised Bees as
COMPLETEDwith a "Bee stopped" message instead ofERROR"Bee killed", and logsSTOPPEDat INFO level;ERROR~/~TIMEOUTsemantics are unchanged for actual failures, and a Bee that survives SIGKILL is always reported asERROR(zombie)
Fixed:
- Supervised Bees vanished from the Hive after
a minute when running under Docker: every ~Wurkmanconstruction ranHive.sync(), which deletes Hive rows whose PIDs fail a local liveness check — so the UI container's 30s Hive poll (a different PID namespace than the worker) deleted the worker's rows. Read-only consumers no longer sync; liveness cleanup runs only in the worker's own run path Hive.delete()now keys on(wurker_bee_id, wurker_cron_id)instead of PID; callers invoke it afterkill()has already resetbee.pid, so pid-keyed deletes silently leaked completed scheduled/ondemand rows (masked by the erroneous sync above), and container PID reuse could delete the wrong Bee's rowHive.add()usesINSERT OR REPLACE(a just-started process always supersedes a stale row) and records the Bee's actualstart_dtrather than the insert time_run_supervised()self-heals: if a live supervised Bee's Hive row disappears externally, it is restored (in-memory Hive refreshed on the 30s control cycle)- A dead supervised Bee's run is now finalized (report status, buffered output) before restart; previously the old run's report stayed
PROCESSINGforever - Report rows are tracked per-run by primary key (
bee.report_id) instead of matched byhive_pid; container PID numbering is deterministic, so a restarted worker would match a previous run's row and overwrite its terminal status (e.g. flipping anERRORback toPROCESSING) Bee.kill()/PyBee.kill()no longer fabricate aCOMPLETEDreport row for Bees that never ran; every shutdown/reload sweep was inserting one NULL-pidCOMPLETEDrow per configured BeeHive.set_runcount()was missing its WHERE clause and updated the runcount of every Hive rowwurk report --slug SLUGsilently ignored the slug filter unless the positionalbeeoption was also given; a bare--slugnow impliesbeerun_forever()had no sleep in its main loop and spun at 100% CPU; it now idles 1s per iteration (scheduling granularity is unaffected — the cron window is ±30s)- Empty stderr is no longer recorded as an empty-string entry in a report's
status_info.errors StatusCommandusedvars()to exposeDBConffields, returning a live reference to the dataclass__dict__; the API status endpoint's obfuscation loop then mutatedconf.LocalDB.urlto the string"URL"andconf.RemoteDB.dsnto"DSN", corrupting theconfsingleton for all subsequent requests — changed toasdict()which returns a copyInitCommandnow callsconf.reinitialize()after the stinger writes the node-specificwurker.toml, so that schema migrations and seeding use the correct (e.g. Postgres) remote DB rather than the default SQLite that was loaded at import timewurk admin initnow raisesClickExceptionon error instead of printing and exiting 0, preventingwurker-uifrom starting after a failed initGET /api/shownow acceptsallas a valid option (the default show-all path used by the Queen when proxying to Drones)- Replaced vendored
datepicker.min.js(basic build, noDateRangePicker) with the full build; the missing class caused aReferenceErrorthat silently prevented the report GridJS table from ever requesting data syslogis no longer offered as a--logchoice when/dev/logis absent;init_loggerfalls back tostderrinstead of raising anOSErrorwhen the configured log destination issyslogbut syslog is unavailable
v0.1.26 - 2026-06-05
Changed:
- Replaced
wurker_bee_cronmany-to-many join table with acron_idforeign key onwurker_bee, reflecting the existing 1:1 bee-to-cron constraint - Alembic migration
a1b2c3d4e5f6addscron_idFK, back-fills it from the old join table, and dropswurker_bee_cron; downgrade reverses the process addandeditcommands now setcron_iddirectly in the INSERT/UPDATE statement rather than doing a post-write join-table updateshowcommand andcorebee-dispatch loop updated to use the scalarbee.cronrelationship instead ofbee.crons[0]- Seed loader resolves the
cron_slugpseudo-field tocron_id(same pattern ascommand_slug); legacywurker_bee_cronseed sections are silently folded in as a backward-compat shim - Default stinger seed (
000_seed.json) migrated to usecron_sluginline on each bee definition - Stinger upgrade (
wurk admin stinger) now runs a_refactor_bee_cron_seedsstep that auto-migrates existing seed files from the legacywurker_bee_cronformat
v0.1.17 - 2026-02-07
Added:
- Added
wurk admin initto run default stinger injection, seed data, and optional status in one step - Added
--username/--passwordtowurk admin initto updatedata/user.jsonbefore seeding
Changed:
- Default remote SQLite database is now
data/wurker-remote.db(local remainsdata/wurker.db) - Settings bootstrap is now lazy to avoid import-time filesystem side effects
- UI auto-initializes its SQLite schema on first run without wiping existing data
- Standardized runtime timestamps to timezone-aware UTC
- Documentation updated for new init flow, split DB defaults, and vendored UI assets
Fixed:
- Alembic migrations now target the configured remote DB URL for SQLite
- Bee run now tolerates missing args; PyBee avoids mutable default args
- Hive logger no longer raises on exception logging
- Packaging no longer references a missing
src/wurker-uimodule - Replaced
croniterwithcroniter-rsfor Python 3.12 compatibility
v0.1.16 - 2026-01-17
Changed:
- Dropped docs/README.md and dropped CHANGELOG.md TOC
- Deleted root README.md, relying on org mode rendering
- Updated documentation and changelog structure
v0.1.15 - 2026-01-17
Changed:
- Dropped and ignored Gemfile.lock
v0.1.14 - 2026-01-17
Changed:
- Pulled v0.1.16
- Updated docs, added CHANGELOG, and fixed a couple small testing bugs
- Updated READMEs
v0.1.13 - 2025-05-15
Added:
- More flexible control/ondemand check window
Changed:
- Debugging control & ondemand out-of-loop
- Debugging PyBee, dispatch and models
- Moved load_plugins to only non-admin commands
- Fixed regression bugs involving PyBee.run()
v0.1.12 - 2025-05-16
Added:
- CommandNotReady exception handling for some commands
- User/group support for systemd service templates and logic
- Working directory configuration for systemd services
Changed:
- Fixed path resolution for scripts directory
- Removed extra output from admin service
- Updated documentation for test.pypi.org release
v0.1.11 - 2025-05-14
Changed:
- Major refactor to use Hatch project manager for PyPI packaging
- Restructured project layout with all modules under
src/wurker - Converted from argparse to Click for CLI framework with nested subcommands
- Implemented plugin system for injected dependencies
- Updated SQLAlchemy to v2.0 syntax
- Revised CLI commands to use
--slugoption and--dronefiltering - Enhanced service configuration with user/group support
- Improved exception handling for
CommandNotReadyerrors - Updated documentation and configuration for system dependencies
v0.1.10 - 2025-05-12
Added:
- CommandNotReady exception handling for some commands
- User/group support for systemd service templates and logic
- Working directory configuration for systemd services
Changed:
- Fixed path resolution for scripts directory
- Removed extra output from admin service
- Updated documentation for test.pypi.org release
v0.1.7 - 2025-04-15
Added:
- Logic to restrict some CLI commands until resources are marshalled
- Bundled node_modules for UI dependencies
Changed:
- Various bug fixes and improvements
- Removed sudo-required functionality
- Updated documentation
v0.1.6 - 2025-04-15
Added:
- No specific changes noted in commit history
v0.1.5 - 2025-04-15
Added:
- Bundled node_modules for UI dependencies
- Updated pyproject.toml for Hatch configuration
- Include src/wurker/etc/ data in package
Changed:
- Updated documentation in preparation for test.pypi.org release
v0.1.4 - 2025-04-14
Added:
- Plugin system implementation for injected dependencies
- Support for MySQL and PostgreSQL databases
Changed:
- Major revisions to multiple components for improved functionality
v0.1.3 - 2025-04-13
Added:
- No specific changes noted in commit history
v0.1.2 - 2025-04-13
Added:
- No specific changes noted in commit history
v0.1.1 - 2025-04-13
Added:
- No specific changes noted in commit history
v0.1.0 - 2025-04-09
Added:
- Complete transition to Hatch project structure
- Full Click-based CLI implementation
- Enhanced documentation system
- GitLab CI/CD integration
Changed:
- Refactored to use modern Python packaging standards
- Updated all dependencies and configurations for PyPI distribution
v0.0.20 - 2024-04-26
Added:
- Add
overruncolumn towurker_crontable (model). - Refactor UIs, seeder and seeds. Make optional everywhere.
- Add
runcountfield towurker_bee_report.status_infofor display. - Wurkers should know if they're Queens or Drones. Both should have an API, but only Queens have a GUI.
- The Queen's Court should provide the same intuitive display and control of Drone data.
- Wurker UI should have a login screen and session.
- Wurker UI and API should support HTTPS.
- After login, the Queen may use Basic HTTP Auth to access Drone APIs.
- User logins should be configured via Stinger.
- Accessing Wurker UI or API (nginx) should be via HTTPS, not HTTP. Should support self-signed certs by default.
- Add
wurk reportsubcommand with filtering. - Add Report view to Wurker UI (separate page) with same filters as CLI.
- Add Action buttons per Bee row, and Cron table, for pre-filtered Report views.
- Implement Alembic migrations in place of current create schema logic.
Changed:
- Derive
timeoutinstead of setting it. If the Bee has a scheduled Cron, then use that as the timeout. If it is a supervised Cron, then it should have no timeout. Ondemand should use the same timeout logic. - Derive
runcountfrom Cron toBaseBee.runcountfor runtime reference. - Upon timeout in
_run_scheduled():- If
bee.overrun == 0then timeout as normal. Set report status toTIMEOUT. - If
bee.overrun > 0 and bee.runcount < bee.overrunthen incrementbee.runcount, and let this Cron overrun the next Cron. Set report status toOVERRUN. - If
bee.overrun > 0 and bee.runcount >= bee.overrunthenTIMEOUTthe overrun.
- If
- Deleting a Bee or Cron should cascade into Report table.
- Add
pidandtimestampHive columns, and set them when the Bee is added to the Hive. - Add nullable
durationHive column, which is set only when the Cron ends. - Change
wurker_bee_report.statusenum to:PROCESSING, OVERRUN, COMPLETED, TIMEOUT, ERROR - Insert record on
bee.run()asPROCESSING - Update status to
OVERRUNupon allowed overrun, or toTIMEOUTif not allowed. - Record
stdouterrors from Bees, and PyBee exceptions intostatus_infoJSON. - Every Cron ending should cause a final write, setting
duration,status, andstatus_info.
*/ Changelog Entries
Copyright
Copyright (c) 2021-2026 by Wurkzen, Inc.
Licensed under MIT license.